
This blog post is a response to a StackOverflow question. Andreas wanted to know how to add ASP.NET Core Identity to an existing Aurelia project. The answer is of course: it depends.
If it's really an existing application but without any authentication support or even without database access, then adding authentication and Identity might prove a bit difficult if you are not familiar enough with ASP.NET Core. At least it was like that before ASP.NET Core 2.1 which brought us Identity UI library and Identity Scaffolding features, among other things.
Identity UI library is implemented as a Razor Class Library, another new feature in 2.1 which enables Razor views and pages to be embedded into class libraries. This was a perfect fit for Identity, so when you create a new ASP.NET Core 2.1 project with Identity enabled, you won't get any Account or Manage views, nor their models. Everything is embedded into the new Microsoft.AspNetCore.Identity.UI assembly/NuGet package.
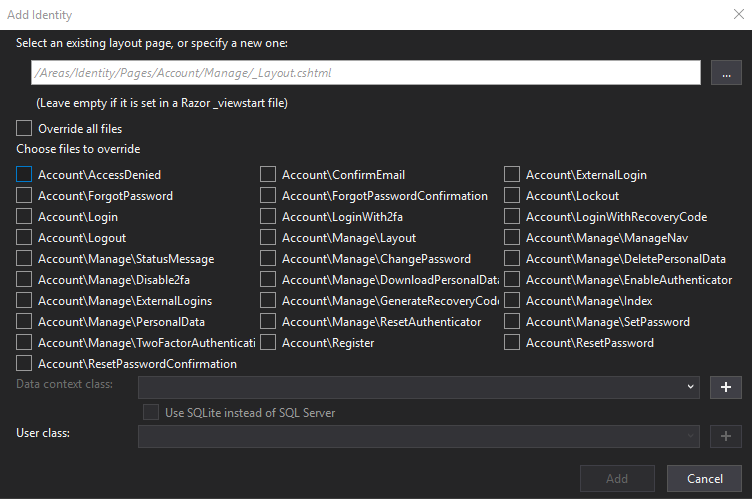
Identity Scaffolding is a new feature that can be used from within Visual Studio or from .NET Core CLI. It's basically a code generator that will generate overrides for any (or all) Identity Razor views, partials or necessary scripts. Talking Dotnet has a good overview of Identity UI Scaffold.
So, this could be the answer to the question? Well, not quite. It will work only on ASP.NET Core 2.1 and above. If the project was created using Aurelia CLI, it would be on ASP.NET Core 2.0. In that case, you first need to upgrade to ASP.NET 2.1.
All of this is for an existing project, but if you are creating a new one, things might be a bit easier.
Creating a new ASP.NET Core project with Aurelia and Identity enabled
ASP.NET Core 2.1 also has a new SPA project templates that are more in line with community usage of client-side frameworks. I.e. the new template for React is using Create React App and the new template for Angular is using Angular CLI. However, there is no template for Aurelia. Neils Morf has a solution for this in his blog post. He basically creates a new project using the Angular template and then modifies few things to run Aurelia instead. Note that you won't need to install the new SPA templates since they come with ASP.NET Core 2.1 (his blog post was written prior to 2.1 release). After that, Identity Scaffold could be used to add Identity to it.
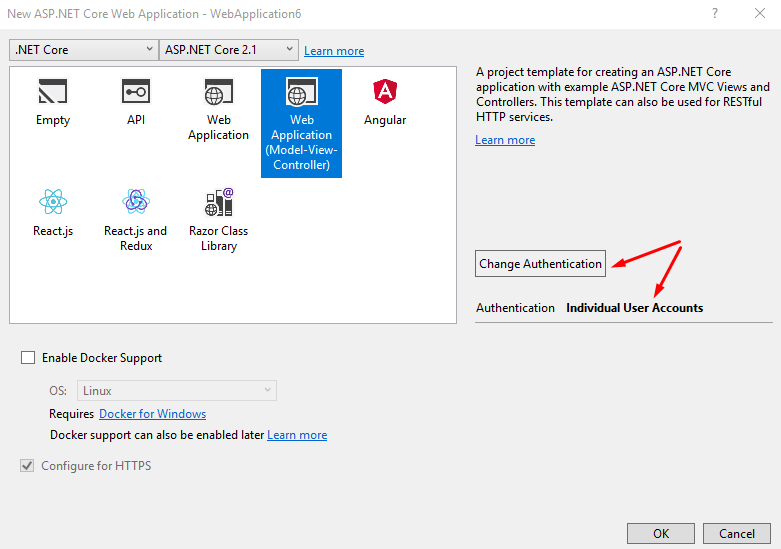
Another approach would be to create a new ASP.NET Core 2.1 project with Identity enabled and then add Aurelia to it. This is what we will do here.
Now create a new Aurelia app in another folder using Aurelia CLI. We don't want the CLI to overwrite files in our ASP.NET Core project. We'll copy and modify files we need manually. Make sure you select TypeScript (that's what OP was using) and ASP.NET Core in options.
> npm install aurelia-cli -g
> au new
Copy the following folders from the generated Aurelia app to the previously generated ASP.NET Core app:
aurelia_projectsrc
And the following files:
index.ejspackage.jsonpackage-scripts.jstsconfig.jsontslint.jsonwebpack.config.jswebpack.netcore.config.js
After these files are copied, we can run npm install to install all the required npm packages.
Before we start modifying files, we need to figure out what we are trying to achieve. There are (at least) three ways we can add authentication, depending on how far we want to go down the rabbit hole:
- Use the default implementation of Identity and protect access to Aurelia app.
- Reimplement the whole ASP.NET Core Identity UI in Aurelia.
- Have something in between, like have login only implemented in Aurelia and the rest (registration, forgot password, management, etc.) implemented in MVC.
We will go with option #1, as that is the easiest route. We'll leave the default Identity implementation intact (login, register, forget password) and serve Aurelia app from the main route (/Home/Index). [Authorize] attribute will be added to HomeController in order to force the user to log in before accessing Aurelia app.
Note that this option will be viable only if we host the Aurelia app within the same ASP.NET Core app. If we had a separate project for it and a separate URL for hosting the client-side Aurelia app, we would probably go with option #2 or #3.
Option #2 is not easy to implement since Identity has a lot of different functionality. That could be a good topic for another blog post. For simple apps, option #1 works pretty well.
Let's start modifying files. First, we'll replace Views/Home/Index.cshtml content in ASP.NET Core app with a content from Views/Shared/_Layout.cshtml of Aurelia app and then define the body and scripts. The end result will be this:
@{
    Layout = null;
    ViewData["Title"] = "Home page";
}
<html>
<head>
    <meta charset="utf-8" />
    <meta name="viewport" content="width=device-width, initial-scale=1.0" />
    <title>@ViewData["Title"] - Aurelia</title>

    <link rel="stylesheet" href="~/dist/vendor.css" asp-append-version="true" />
</head>
<body>
    <div aurelia-app="main">Loading...</div>

    <environment names="Development">
        <script type="text/javascript" src="~/dist/vendor.bundle.js" asp-append-version="true"></script>
        <script type="text/javascript" src="~/dist/app.bundle.js" asp-append-version="true"></script>
    </environment>
    <environment names="Production">
        <script type="text/javascript" asp-src-include="~/dist/common.*.bundle.js" asp-append-version="true"></script>
    </environment>
    <environment names="Staging, Production">
        <script type="text/javascript" asp-src-include="~/dist/vendor.*.bundle.js" asp-append-version="true"></script>
        <script type="text/javascript" asp-src-include="~/dist/app.*.bundle.js" asp-append-version="true"></script>
    </environment>
</body>
</html>
Next thing - Startup class. In there we need to add two things, to enable Webpack dev middleware, which is a part of JavaScriptServices and to add SPA fallback route. Both of those changes are inside Configure method, so this is how it will look like after:
public void Configure(IApplicationBuilder app, IHostingEnvironment env)
{
    if (env.IsDevelopment())
    {
        app.UseDeveloperExceptionPage();
        app.UseDatabaseErrorPage();

        // This is added
        app.UseWebpackDevMiddleware(new WebpackDevMiddlewareOptions
        {
            HotModuleReplacement = true,
            ConfigFile = "webpack.netcore.config.js",
            HotModuleReplacementClientOptions = new Dictionary<string, string> { {"reload", "true"} }
        });
    }
    else
    {
        app.UseExceptionHandler("/Home/Error");
        app.UseHsts();
    }

    app.UseHttpsRedirection();
    app.UseStaticFiles();
    app.UseCookiePolicy();

    app.UseAuthentication();

    app.UseMvc(routes =>
    {
        routes.MapRoute(
            name: "default",
            template: "{controller=Home}/{action=Index}/{id?}");

        // This is added
        routes.MapSpaFallbackRoute(
            name: "spa-fallback",
            defaults: new {controller = "Home", action = "Index"});
    });
}
If we try to build the project now, we'll get TypeScript (tsc) errors, since it seems to be too eager to include all .js files it finds into compilation. To prevent it, wwwroot and ./*.js exclusions need to be added into tsconfig.json file:
"exclude": [
    "node_modules",
    "aurelia_project",
    "wwwroot",
    "./*.js"
]
Great, we can run the application now and get the output from Aurelia, but no authentication has been involved. Let's add [Authorize] attribute to HomeController's Index method.
public class HomeController : Controller
{
    [Authorize]
    public IActionResult Index()
    {
        return View();
    }

    // other methods ...
}
If we run the application now and browse https://localhost:[port]/, we will be automatically redirected to login page. After login (and probably the initial registration), we will be redirected back to the home page which hosts our Aurelia app.
We can also try building Aurelia app from the command line with au build. It should work as expected. In fact, there's one more feature we missed when copying from the Aurelia app generated with au new. Project file also contained an additional target for publishing the Webpack Aurelia output:
<Target Name="PublishRunWebpack" AfterTargets="ComputeFilesToPublish">
    <!-- As part of publishing, ensure the JS resources are freshly built in production mode -->
    <Exec Command="npm install" />
    <Exec Command="au build --env prod" />
    <!-- Include the newly-built files in the publish output -->
    <ItemGroup>
        <DistFiles Include="wwwroot\dist\**" />
        <ResolvedFileToPublish Include="@(DistFiles->'%(FullPath)')" Exclude="@(ResolvedFileToPublish)">
        <RelativePath>%(DistFiles.Identity)</RelativePath>
        <CopyToPublishDirectory>PreserveNewest</CopyToPublishDirectory>
        </ResolvedFileToPublish>
    </ItemGroup>
</Target>
With this change, dotnet publish operation now also creates an output from Aurelia app.
That's it, we have a client-side Aurelia app used in combination with server-side ASP.NET Core app with authentication and ASP.NET Core Identity enabled. By default, a cookie-based authentication is configured. If we need to make an API calls from Aurelia app to ASP.NET Core, we would also need to send cookies with each fetch request from the client - assuming that authorization is required for all API calls on the server side (and you do require it, don't you?). Usually, cookie-based authentication is not the best choice for API calls. Token-based authentication should be used instead.
Bonus: Authorizing API calls from Aurelia app with JWT tokens
The plan is to leave the current cookie-based authentication enabled for use in Identity (and potentially other MVC based pages) and to add JWT token based authentication too. Shawn Wildermuth has a good post about enabling dual mode authentication.
The following code should be added to Startup.ConfigureServices method, just before the services.AddMvc()... line:
services.AddAuthentication()
    .AddCookie(cfg => cfg.SlidingExpiration = true)
    .AddJwtBearer(cfg =>
    {
        cfg.SaveToken = true;

        cfg.TokenValidationParameters = new TokenValidationParameters()
        {
            ValidIssuer = Configuration["Tokens:Issuer"],
            ValidAudience = Configuration["Tokens:Issuer"],
            IssuerSigningKey = new SymmetricSecurityKey(Encoding.UTF8.GetBytes(Configuration["Tokens:Key"]))
        };
    });
This code depends on a presence of several configuration options, so we need to add those to appsettings.json or another configuration source. Make sure these options are overridden and that strong key is used for production.
"Tokens": {
    "Key": "2b0c0b6d-28ee-430b-b644-aaf99a195161",
    "Issuer": "https://miroslavpopovic.com"
}
Now that we have added JWT authentication, we need to have a mechanism of sharing the token and other data with the client side app. One easy approach might be to generate new JWT token each time user access the home page and send it to the browser together with the HTML that hosts Aurelia app. It avoids the extra call to the server to retrieve user data (including the token), but be aware that it might not be the best choice from the security standpoint - make sure you are on HTTPS!
This class will contain the data that will be passed on to the client:
public class ConfigViewModel
{
    public string UserName { get; set; }
    public string Token { get; set; }
}
Let's add GenerateToken method to HomeController:
// A better approach would be to have this in a separate class
// Note that this is just a sample implementation!
private static string GenerateToken(string name, bool isAdmin, string issuer, string key)
{
    var claims = new List<Claim>
    {
        new Claim(JwtRegisteredClaimNames.Sub, name),
        new Claim(JwtRegisteredClaimNames.Jti, Guid.NewGuid().ToString())
    };
    if (isAdmin) claims.Add(new Claim(ClaimTypes.Role, "admin"));

    var securityKey = new SymmetricSecurityKey(Encoding.UTF8.GetBytes(key));
    var creds = new SigningCredentials(securityKey, SecurityAlgorithms.HmacSha256);

    var token = new JwtSecurityToken(
        issuer,
        issuer,
        claims,
        expires: DateTime.Now.AddDays(1),
        signingCredentials: creds);

    return new JwtSecurityTokenHandler().WriteToken(token);
}
We'll inject IConfiguration into HttpController constructor and modify the Index method to call token generator and give necessary data to the view:
[Authorize]
public IActionResult Index()
{
    var token = GenerateToken(
        User.Identity.Name,
        User.IsInRole("admin"),
        _configuration["Tokens:Issuer"],
        _configuration["Tokens:Key"]);

    return View(new ConfigViewModel {UserName = User.Identity.Name, Token = token});
}
The Index view also needs to be changed. @model ConfigViewModel needs to be added to the top and <div> that acts as a container for Aurelia app needs to accept data-* parameters:
<div aurelia-app="main" data-username="@Model.UserName" data-token="@Model.Token">Loading...</div>
In Aurelia app, we'll modify main.ts to register the instance of serverConfig:
aurelia.container.registerInstance(
    'serverConfig',
    Object.assign({}, (aurelia.host as HTMLElement).dataset));
app.ts or any other components can now inject serverConfig and use it for binding, API calls, etc.:
import { inject } from 'aurelia-framework';

@inject('serverConfig')
export class App {
    message = 'Hello World!';
    serverConfig;

    constructor(serverConfig) {
        this.serverConfig = serverConfig;
    }
}
app.html content:
<template>
    <h1>${message}</h1>
    <h2>Welcome ${serverConfig.username}</h2>
    <p>Your JWT token for API calls is: ${serverConfig.token}</p>
</template>
Finally, we'll add DataController that will require JWT authorization for calls:
using System;
using Microsoft.AspNetCore.Authentication.JwtBearer;
using Microsoft.AspNetCore.Authorization;
using Microsoft.AspNetCore.Mvc;

namespace AspNetCoreAurelia.Controllers
{
    [ApiController]
    [Authorize(AuthenticationSchemes = JwtBearerDefaults.AuthenticationScheme)]
    public class DataController : Controller
    {
        [HttpGet("/api/data")]
        public IActionResult Index()
        {
            return Ok(new {data = new Random().Next(1, 100)});
        }
    }
}
To call the API we'll use aurelia-fetch-client plugin which needs to be installed first:
> npm install aurelia-fetch-client
Again, app.ts will be modified with a new loadData() method that's using aurelia-fetch-client:
import { inject } from 'aurelia-framework';
import { HttpClient } from 'aurelia-fetch-client';

@inject('serverConfig', HttpClient)
export class App {
    data;
    message = 'Hello World!';
    http;
    serverConfig;

    constructor(serverConfig, http) {
        this.serverConfig = serverConfig;
        this.http = http;

        http.configure(config => {
            config
                .useStandardConfiguration()
                .withBaseUrl('/api/')
                .withDefaults({
                    headers: {
                        'Accept': 'application/json',
                        'Authorization': 'Bearer ' + serverConfig.token
                    }
                });
        });
    }

    loadData() {
        this.http.fetch('data')
            .then(response => response.json())
            .then(result => {
                this.data = result.data;
            });
    }
}
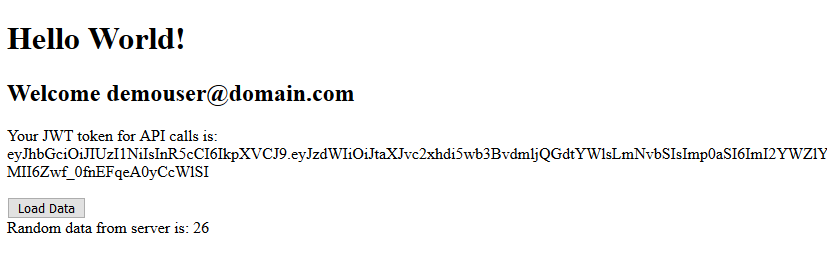
app.html will be modified too to have a button that triggers the call to loadData() method and displays the result of the API call:
<template>
    <h1>${message}</h1>
    <h2>Welcome ${serverConfig.username}</h2>
    <p>Your JWT token for API calls is: ${serverConfig.token}</p>

    <button class="btn btn-default" click.trigger="loadData()">Load Data</button>

    <div if.bind="data">
        Random data from server is: ${data}
    </div>
</template>
Here's the final result in all its glory:
The finished sample code can be found on GitHub.
Summary
So, that's it. We talked about how to add ASP.NET Core Identity to the existing project with ASP.NET Core and Aurelia. After that, we have considered options for creating a new ASP.NET Core and Aurelia project that has Identity implemented from the start and choose to implement the easiest one.
Unfortunately, we don't have a template that would cover this - to generate an ASP.NET Core app with Identity and Aurelia, but it's not that hard to do it now when we have Aurelia CLI at our disposal and also Identity scaffolding. It will be even easier when Aurelia CLI updates the ASP.NET Core output to 2.1. Hopefully, it will happen soon and you can always jump in to help, it's open source after all :).
Finally, I will leave you with a thought. Do consider whether you really want to have Aurelia (or any other client-side framework) in the same project as your backend. Microservices are a buzzword today, and with a good reason. Serving static client-side code and serving backend API from the same server may affect the performance. When you have them separately it's easier to scale them appropriately. The client-side code could be served from CDN optimized for static files and with aggressive caching involved. Backend code could then be scaled up easily to accommodate higher request count and not to be bogged down by static files. There are a PowerPoint presentation and sample code that you might find interesting on my GitHub repository with a microservice-like organization. It has ASP.NET Core backend, Postgres database, HAProxy balancer and Aurelia frontend in separate Docker containers.
Again, the code from this post can be found on GitHub.
comments powered by Disqus